Introduction | Drivers (DVB/ATSC hardware) | iTele (viewer app) | Mpegitor | Forums
iTele
iTele is a Mac OS X application that allows you to watch and record Digital TV (including HDTV) on your Mac. It works with the hardware drivers found here. Note that iTele requires you to have access to one of those devices in order to watch TV! (This should be obvious but I get a surprising number of questions from people without any TV hardware.)
iTele can use MPlayer for Mac OS X to playback MPEG streams, but there are many more features available if you use the internal display code (however it doesn't work on some older Macs yet). Instructions for installing MPlayer are contained in the Read Me file, included below.
If you use iTele, or if you have problems getting it to work, then please email me! Also check out the forums for updates and help.
Using iTele
Running for the first time
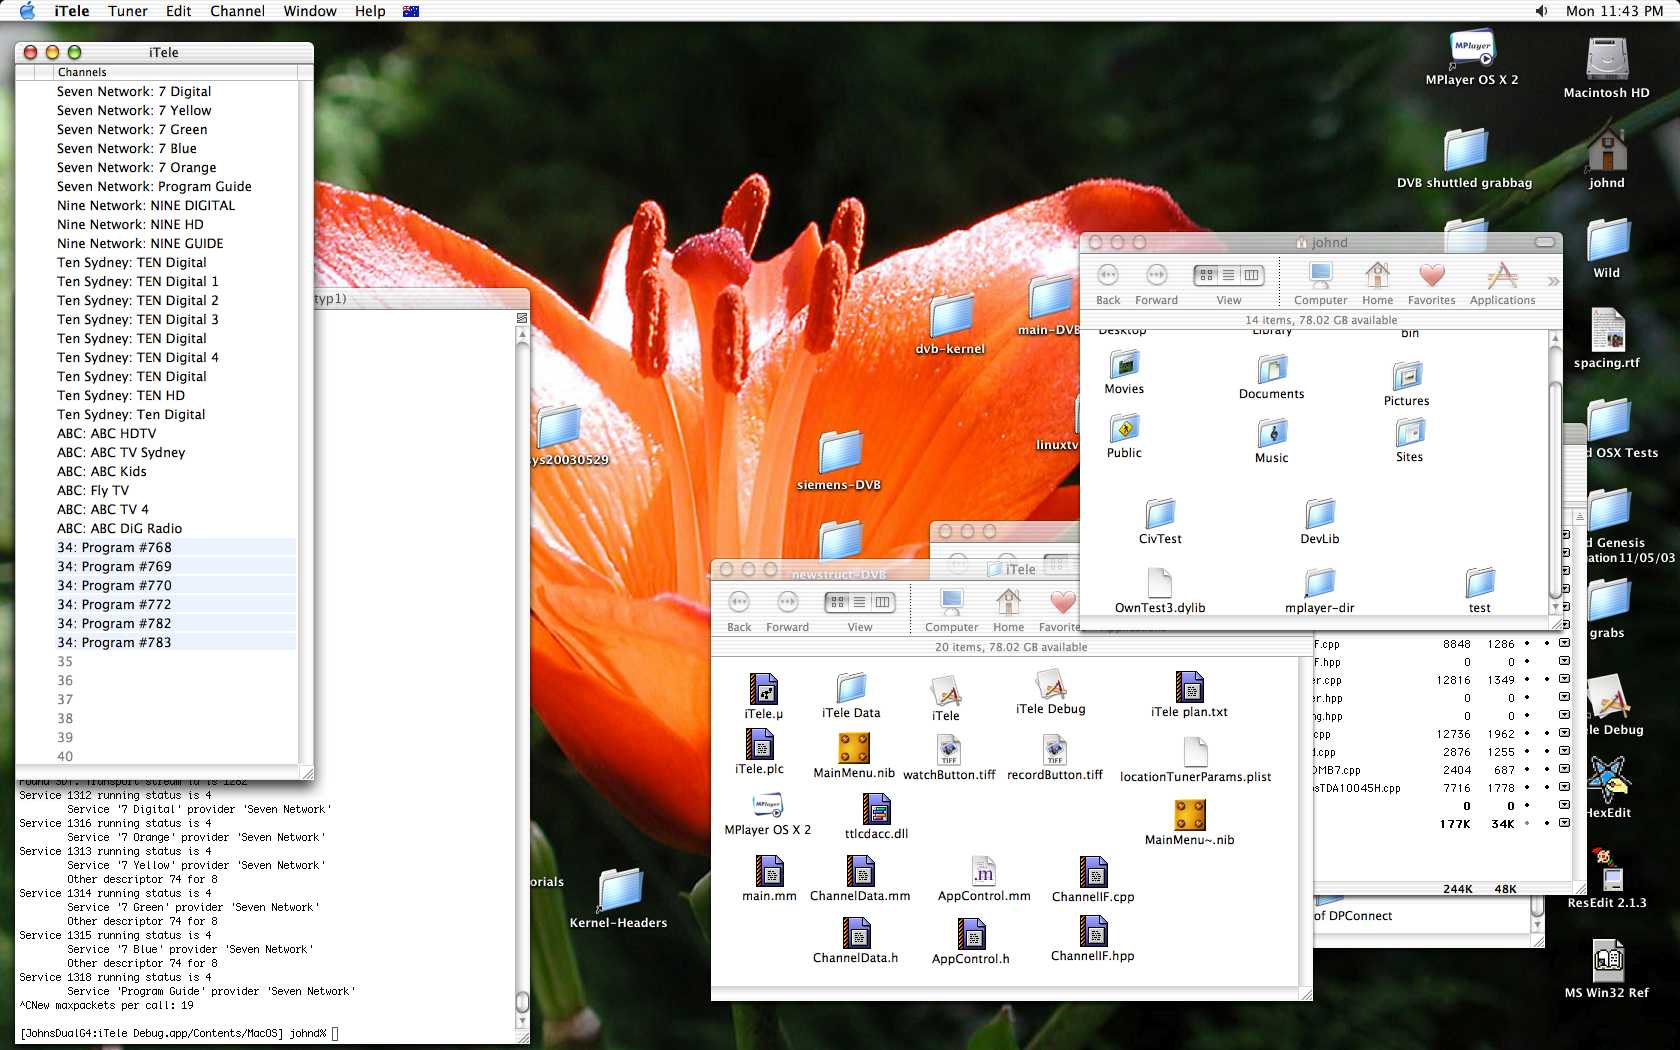
If everything goes according to plan, when you run iTele it will initialise all the Digital TV input devices it finds, and then present you with the Channels window. If you haven't run iTele before then this window will be empty. So when you run iTele for the first time (or move cities), you need to scan for channels, just like with a TV. This function is found in the 'Tuner' menu.
Since iTele supports using multiple tuners in your Mac simultaneously, you must tell it which input device to scan on (even if there is only one). Do so by bringing up the Inputs window via the Window menu, and clicking on the input device you wish to scan. Then use the menu item or click the Scan button in the drawer which appears.
Satellite tuners only: If you are using a satellite input device, before you scan you must first fill in some information about the antenna network connected to your tuner. Click the Edit button and enter the details of your LNB. Currently only simple LNB settings are supported, full DiSEqC networks will be coming later.
Now, before scanning starts, you will be prompted to select your location (or the location of the signal source), so iTele can scan the appropriate frequency range. If your location does not appear in the list then please get in touch with me and I will add it. If you have a satellite tuner and your satellite does not appear, you can drag the page that contains the satellite tuning specifications from LyngSat onto the Scan panel and iTele will add that satellite as an option in the list.
The scanning process may take some time - probably around 5 minutes - but you can watch its progress in the Channels window. As signals are discovered, the names of the channels available on that frequency are added to the list in that window. If no channels are found then the grey placeholder entry for that frequency is removed. Here is a screenshot showing a scan in progress.
If you quit during a scan then the scan will be interrupted and the unscanned frequencies will remain greyed out in the Channels window. You can scan each one individually by clicking it, or you can start the scan again. Currently scanning erases your existing list of discovered channels for that location. This will be made optional in a future release.
Watching and Recording
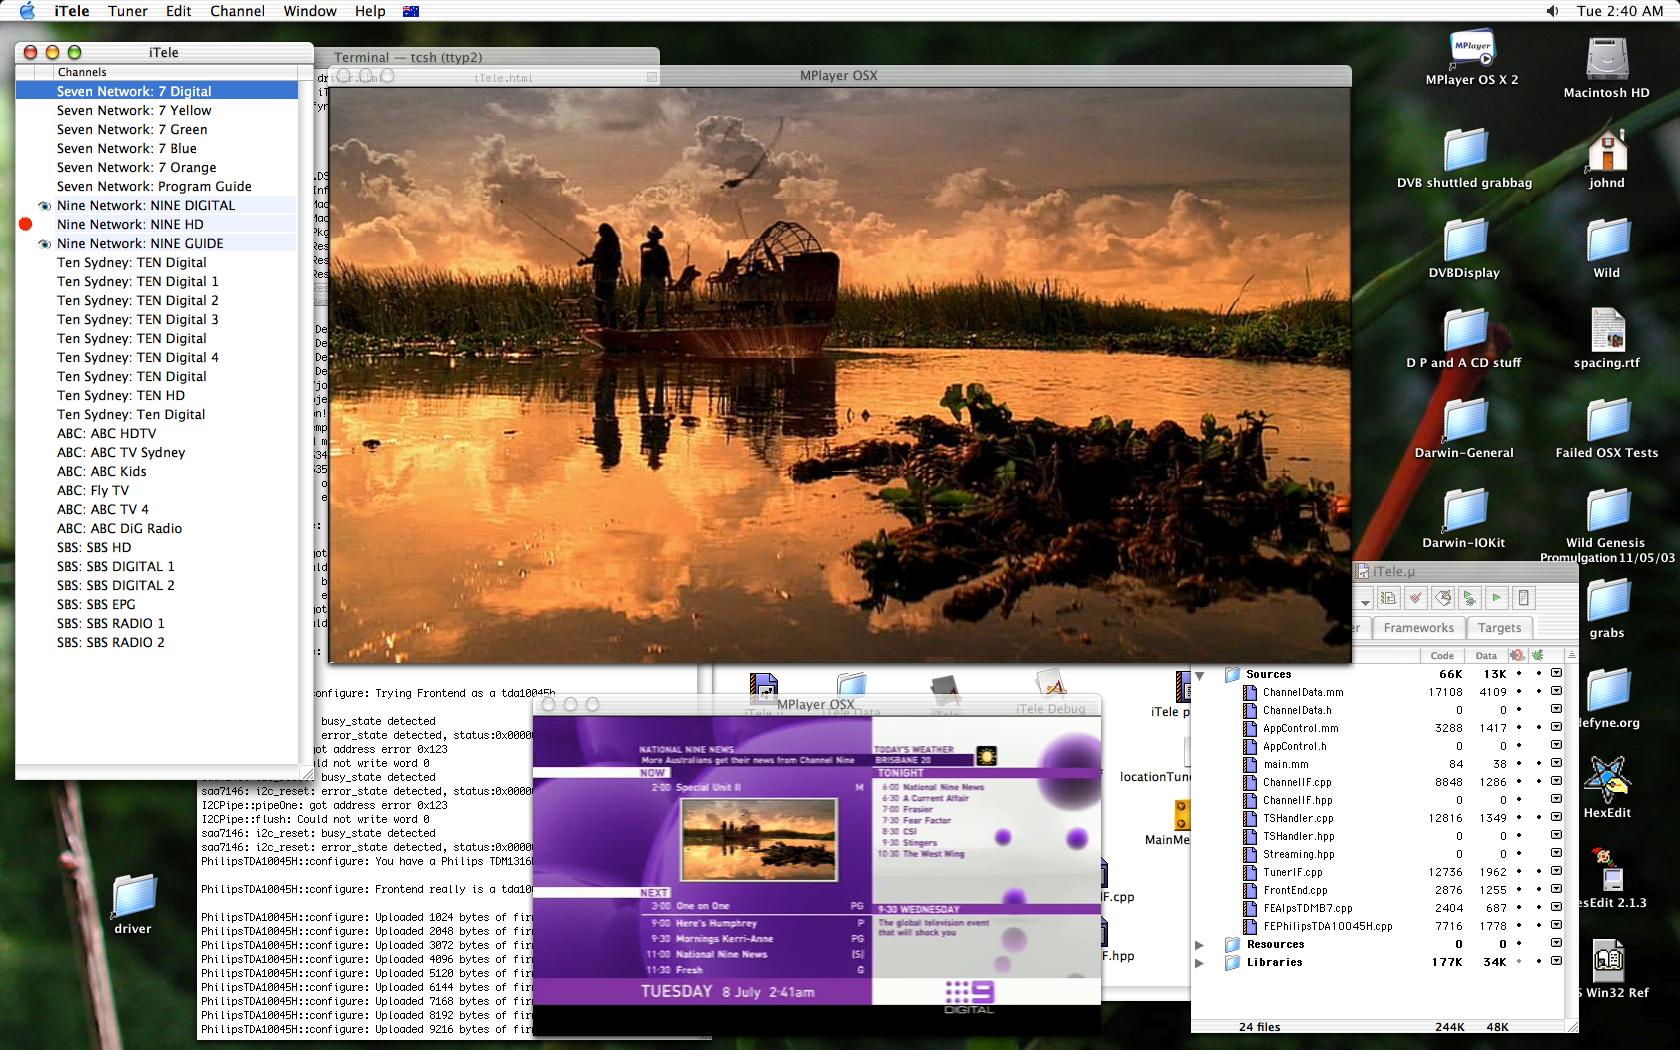
The Channels window is the main interface to iTele. It contains a list of channels discovered through scans. Channels are named by their 'provider name' followed by their 'service name'. You cannot rename them, but that naming usually works out fine.
To watch a channel, simply double-click it, and an MPlayer (or internal) window will open to show that channel. A little icon of an eye will appear to the left of the channel name. You can watch a channel full-screen by selecting that item from the 'Channel' menu. There is also an option for watching it scaled-down. To stop watching a channel click the close box in the MPlayer window, or hit escape if watching full-screen.
To record a channel, simply select it and choose record from the 'Channel' menu. A little record symbol will appear to the left of the channel name. To stop recording you also use the 'Channel' menu. The channel is recorded to a file in your home directory named after the channel and current date. The file is a '.mpg' file in the MPEG-2 Program Stream format. You can play it back in MPlayer for free and (sometimes) QuickTime Player if you have the MPEG-2 QuickTime codec which costs US$20 from Apple.
When you are watching or recording a channel, all the channels on the same frequency will be highlighted. This represents the frequency that the input device is currently tuned to. You can watch and/or record as many highlighted channels as you like (unless you have a USB device in which case you are limited by the USB bus bandwidth). Here is a screenshot showing watching and recording multiple channels simultaneously. Note that if you ask iTele to watch or record a channel on a different frequency, unless you have multiple tuners and one is free, then it will first have to stop any activity on the highlighted channels, i.e. MPlayer windows will be closed and recordings will be stopped. You are not asked if you want to do this because it is usually what you want when you are switching channels anyway. The same goes for if you ask iTele to quit.
Scheduled Recording
The scheduled recording feature of iTele was new in version 0.3.0, and is still in testing. But it is hopefully better than nothing for those going away over Christmas! Use the Windows menu to bring up the Scheduled Recordings window. You can enter details for the channel that the program is on, the name of the program, its start and stop times, and how often it airs.
In order for recording to occur, all the conditions specified in its entry must be true. For example, if you just put 'Buffy' as the program name and no other info, then iTele will scan through and watch all channels as necessary to update their EPG information and record a show with 'Buffy' in its title or details whenever it comes on whichever channel it is on. Or if you just put 'Channel 7' as the channel name and from 10:30 to 11:30 on Tuesday, with a regularity of 'Weekly', then it will record channel 7 every Tuesday between those times until you tell it to stop.
There are basically two kinds of recordings, those based on EPG information as in the first example above, and those based on manually entered times and dates as in the second example above. If you specify start and stop dates as well as a program name then it will look for that program only between those dates. It may be helpful to provide a channel name for EPG-based recordings though just to cut down on the amount of TV iTele has to watch :)
Notes:
- iTele must be running for the recording to occur.
- Put channel names in double quotes e.g. "Network Seven: 7 Digital" to exactly match the text in the channels list or EPG.
- Leave the program name field blank unless you really want Tele to consult the EPG.
- Enter dates in natural language, i.e. to record something at 2pm tomorrow just type '2pm tomorrow'.
- You cannot change an entry while recording (or watching) is in progress; all you can do is delete it.
- If you are trying to watch something else when it is time to record then it will interrupt you and follow its scheduled instructions.
- If you are editing something in the scheduled recordings list then it will wait for you to finish (usually :).
- Currently only one channel can be watched or recorded even when there are multiple ones on same frequency or you have multiple tuners.
- If one recording operation is blocking another, when that operation finishes the blocked one will immediately start (if it is still valid).
Timeshifting
New in version 0.5, iTele has the capability to do time shifting! At last! Attached to the bottom of every internal display window is a little controls drawer (or utility panel if space is tight). Press space or use the Show Controls menu item to bring it up. You will find a watch pause button, a record pause button, and a volume slider. Clicking the record button will toggle recording on that channel, just like selecting it from the menu. Clicking the watch button will simultaneously pause the live stream and start recording. If you click the watch button again then playback will resume from the point you paused at, as if you had magically paused time. What really happens is that the live stream is being written to the disk at the same time as the previously recorded one is being read to display it for you.
When iTele is recording or if any recording has been done since the drawer was opened, then the drawer expands to expose a lot more controls. First up there is a button to jump to the start of the recorded stream, and one to jump to the live stream. These do not affect the recording in any way (only the record button does that). Between them there is a large slider over a bar that displays which segments of time have been recorded. The slider's playhead displays the current location of the playback. Every so often the bar and slider have to rescale when the recording passes beyond the end of the bar (it doesn't rescale if just the playhead passes beyond it). You can move the playhead anywhere over the bar to commence playback from that point. It will always unpause but you can just click the pause button to pause it again. (Pausng does not cause recording to start if you were playing back the recorded stream - only if you were watching the live stream).
Above the slider is a text field that allows you to change the name of the recording. Only rename the recording here, as doing it in the Finder will cause iTele to lose track of it. You can also drag the icon of the recording to move it somewhere else on the same disk, even while you are recording to the stream (you cannot move it between disks ... yet). To the right of the field the path to the recording is displayed. To the right of that is an indication of the current size of the recording as well as the space remaining on the disk where it resides.
The recording state as represented in the bar will remain as long as the channel is being either recorded or watched (not necessarily live - as long as the window is up). If you stop doing both of those at the same time then the recording state is discarded and you cannot get it back. But of course, the recorded stream is still there on disk, you just cannot get iTele to display it (yet).
Preferences
New in version 0.5 is a real Preferences window. I'll get around to writing it up at some stage.
It lets you choose the display algorithm, the recording name format, drag out to specify temporary (hit pause) and default (all other) recording folders, and in future will let you specify a different external display application. But it's far too late at night to go into all that now.
Troubleshooting and Tips
The first thing to do if you have a problem is to check out the forums. It's likely another iTele user will have had the same problem and can help you with it.
If iTele cannot find any multimedia input devices, then make sure that you have installed the hardware correctly. In particular, make sure that you have read and followed the instructions about obtaining firmware in the installer for the drivers. You cannot just click through them!
If you have a problem running iTele, then some useful information can be obtained by running it from the command line. If you installed iTele in the Applications folder, you can do this by entering the following command into a Terminal window: /Applications/iTele.app/Contents/MacOS/iTele
You can get similar information by looking at its output in the Console utility.
Log messages related to driver activity may be found in the system log, which you can get a running display of with the following command: tail -f /var/log/system.log
MPlayer has problems playing back 1080i HD channels at full size and speed (e.g. crashes if buffer is over 1024 pixels high). I've now integrated the functionality of MPlayer into iTele, using libavcodec in ffmpeg. You can enable it with the 'Use Internal Display' menu item. Please give me feedback on this option - I know it has problems with some graphics cards.
As of version 0.5.2, iTele has minimal support for ATSC, so that cards like the DVICO Fusion HDTV 3 ATSC card will work. The support is fully functional for watching/recording/timeshifting HDTV albeit quite basic. There is as yet no channel or event information parsing - however I do intend to remedy this lack in the near future.
iTele requires at least Mac OS X 10.2 (Jaguar). Versions since 0.2.5 have only been tested on Mac OS X 10.3 (Panther), which is what I use. iTele v0.5 requires Panther, but I found the problem and added back Jaguar support since v0.5.3.
Change Log
New in v0.6.4
- Download iTele v0.6.4 from 1/11/2006
- Fixed many bugs on Intel.
- Implemented External Displayer preferences box.
- Using ffmpeg with Intel SIMD optimisations now that they compile on Mac OS X.
- ... more changelog to come when I have time to go through the commits.
New in v0.6.3
- Download iTele v0.6.3 from 17/5/2006
- Ported to the Intel X86 architecture (and XCode 2.2; gcc 4.0). Using a funky combination of macros and templates (yep! :) to keep all the MPEG/DVB/ATSC big-endian bitfields as originally written with their natural and efficient syntax. Devolves to C fields on big-endian CPUs and is not too bad at all on little-endian CPUs. Very happy that this worked out ok.
- FFMpeg on Intel is compiled without mmx/sse since Apple's assembler doesn't understand their syntax. Playback is still plenty fast enough for a first version 'tho, even with HD. Updated to latest FFMpeg about mid-March.
- Support for C-band LNBs that subtract from the LOF instead of add to it.
- Fixed a crash bug when unscheduling a recording via the Event Timeline (some NSDates weren't always retained).
- Fixed a possible double free problem if you scanned, then scanned again with no tuner selected, then scanned a third time with a tuner selected.
- Improvements with detecting and connecting to Bonjour services. Especially when they disappear then reappear after sleep.
New in v0.6.2
- Download iTele v0.6.2 from 14/8/2005
- Detecting when a Bonjour service is running on the local machine, and connecting to it over the IPv4 localhost address in that case. Tricky, beccause sometimes we are only told the IPv6 localhost address even 'tho the IPv4 one is available. This should fix some problems where iTele could not see or connect to a locally installed device.
- Fixed some buffer underrun errors that allowed streams corrupted in particular ways to crash iTele in memcpy.
- Fixed potential bug where service info (channel names, etc.) for a channel would be discarded if it was complete before the PAT was.
- When a video window is displaying video, the display will no longer dim and the computer will not go to sleep due to inactivity.
- Fixed bug with reading dates back in from saved scheduled recordings. Now using NSArchiver instead of [NSDate description].
- Exposed scheduled recordings to AppleScript. You can examine, modify, add and (probably) delete scheduled recordings from AppleScript and iTele should pick up the changes just as if the user edited them directly.
- Parsing DVBData descriptors for IP-over-DVB and stuff inside that. Output is unfinished and disabled in this version.
- Parsing CA_identifier sections and sending PMTs to CA descramblers for drivers that support them (none released at time of writing). This breaks compatibility with drivers before v0.8.2 of the MMInputFamily package.
New in v0.6.1
- Download iTele v0.6.1 from 1/6/2005
- Fixed bug with parsing and display of EPG events more than a full day away.
- Hopefully fixed bug with non-ASCII channel/event names in scheduled recordings.
New in v0.6.0
- Download iTele v0.6.0 from 28/5/2005
- Using Bonjour to find and Distributed Objects to talk to goods vended on the Userspace Driver Market. Goods of type MMInput are expected to implement the MMInputProtocol Objective-C protocol. They may be found anywhere on the local network. This replaces the use of MMInputLib to find and talk directly to kernel MMInput drivers.
- Removed the initialisation panel and corresponding startup mode. Tuners may now be found at any time and are activated in individual background threads. Upon successful activation they become available to the rest of the program.
- Handling the case where a tuner is removed, even if the user is watching or recording with it at the time. Some drivers in the kernel may not handle the case so elegantly themselves however.
- All known channels are now always displayed in the Channels window. Their visibility no longer depends on whether there are tuners available to tune them. Channels are matched to available tuners when they need to be streamed instead of at startup.
- Added AppleScript support! All the Channels window hierarchy right down to event info records, plus the internal display windows. ('Tho scheduled recordings didn't make it into this cut, sorry.) You can control streaming, recording, watching (video+audio), extract event info, etc. In the internal display windows you can query and set the playhead, pause/record, adjust the volume, etc.
- Replaced parsing of now and next events with an array of all events, and parsing extended event info tables too, so info on events after the next one for up to a week are extracted. The age rating, id and items array are now also extracted and promoted to the ObjC event info representation. The long event name is appended to the short event name as some channels use it that way and it is better not to throw away any data anyway. And fixed that problem where the EPG would appear not the refresh, which was due to a bug that prevented old events from ever being dislodged - not that it just did not run the timer to refresh the display as assumed.
- Finally replaced the dodgy unreadable columns of Now/Now Details/Next/Next Details with a new graphical Event Timeline! Events are represented as boxes placed and sized horizontally according to their occurrence and duration. Events display their details in a tooltip when the mouse cursor rests upon them. The Event Timeline is redrawn every minute even if there is no new info since time is always marching on.
- Events in the Event Timeline may be selected by clicking on them. The Record On/Off options then add/remove the event in the scheduled recordings. Currently the event start and stop times are added, not the event id or name, so if it changes time later the recording will occur only at the original scheduled time. Also, times must be an exact match to show up in the event timeline, so scheduled recordings entered by hand by the user are very unlikely to appear there.
- Removed the state machine in the transport stream parser! You no longer have to wait to get the PMT for all the programs on a stream before any can be output. PMTs are now accumulated in parallel and multiple PMTs on the same pid are processed more efficiently. Effectively, 'tho, you will still have to wait until the PAT and the PMT for the program you want to watch have been received. This will mainly show an improvement for large satellite transponders with lots of programs on them. But it's a much cleaner approach and full of reactive parallel fuzzy goodness :).
- Also in the transport stream parser, new versions of all tables (including the PAT and PMT) and now handled and incorporately smoothly into the existing information. If a program disappears, its output handler will be suspended. If it reappears, the output handler will be resumed. This does not work for bandwidth-limited devices (i.e. USB 1.1) because the PAT/PMT pids are not put back into the pid filter after their first version has been received, to save on pid slots.
- Implemented a new push-based system to update the Channels window display. The old timer-based system is now gone. Whenever a stream parser updates its info with a new version of a PSI table, it signals the main thread to refresh the Channels window. Not only is this more efficient, it is also more reliable and responsive. Multiple updates are coalesced so the main thread is not unduly burdended (and so the mach port doesn't get full and block the stream parser :).
- Implemented the Tuner Details drawer at last! When visible the tuner is polled twice a second to get its situation and statistics. Appears to have no adverse effects on streaming, although it probably pushes out the latency of the internal display a little. The 'signal' level is not yet reported by any driver and so will always be zero.
- Each program may now have an audio stream preference, which may be set from the new Settings submenu in the Channel menu. Currently the program is not consulted to see how many audio streams are actually available - instead there are 4 options for that index audio stream in the program, and the default 'auto' option to choose the best stream as before. Selecting the menu item cycles through the options (dodgy I know - apologies).
- Each channel now has an optional 'tight bandwidth fit' setting. Enabling this makes the main pids of the most recently streamed program take precedence over all others. It is only useful when operating with a restricted bandwidth device, i.e. a USB 1.1 device. Some terrestrial programs in Italy are so large that the whole program will not fit through USB 1.1, but selected stream elements will - probably due to multiple audio streams. Selecting this option will disable all ancilliary streams for that channel, including the EPG, service information, and PAT/PMT updates (if they worked for such devices).
- Added a preference to the Preferences to control the removal of all channels before scanning, enabled by default. If the option is enabled, then old channels from the same location will be deleted before rescanning, as previous versions of iTele did. If the option is disabled, then the existing channels will be bunched up and moved to the end of the list, then the missing channels from that location are added after them and the scanning starts from there. The existing channels are not rescanned.
- Added a preference to the Preferences to control the removal of old programs from a channel. It is enabled by default. Now when a channel is tuned, all the old programs are removed from it as soon as the PAT is received. If it is disabled, then the old programs will be left there, but of course they will not be able to be successfully streamed unless/until they come back. Some terrestrial channels in the USA add and remove programs according to the time of day.
- Moved the 'Use Internal Display' preference from a menu item to the Preferences window, and storing it with the other prefs using the NS defaults system. Now defaults to enabled.
- Added Sweden and France as aliases of UK in the locations list.
- Added Italy with its own special VHF channels into the locations list.
- Added Taiwan with its 6 MHz OFDM channels into the locations list.
- Applying 'Watch Off' on a channel that is streaming but has no-one watching or recording it now stops streaming the channel. This is currently the only way to get the tuner to stop streaming after iTele has once started streaming. (Bar quitting iTele / unplugging the device of course :)
- Fixed determination of sampleAspectRatio (and thus window size) when pan'n'scan info is specified in the MPEG stream. Tested with a sample of a stream that was coming up the wrong size.
- Changed key to bring up Preferences to the more usual command-comma.
New in v0.5.8
- Download iTele v0.5.8 from 1/3/2005 (repackaged v0.5.8b1 linked here on 28/5/2005)
- Wrote working ARB fragment shader video algo for new graphics cards like the GeForce 6800.
- Wrote nVidia register combiner video algo for older GeForce graphics cards.
New in v0.5.7
- Download iTele v0.5.7 from 27/2/2005
- Fixed some more stability problems parsing corrupted system info streams.
- Fixed a bug switching off timeshifted playback where the compiler optimised something incorrectly.
- Added a priority pids feature which can be fallen back on if there isn't enough bandwidth to receive all the elements (pids) of a program (untested).
- Enabled the ARB fragment shader video algo (untested).
- iTele will now launch even if you have no MMInput devices connected.
New in v0.5.6
- Download iTele v0.5.6 from 5/1/2005 (written up 26/1/2005)
- Implemented a multipass algorithm for the internal display. Needs 3 texture stages, with works on a lot more graphics cards (especially on iBooks), but there's still some cards that can't handle it.
- Fixed bug with 5.1 channel AC3 sound where only the rear channels would be heard.
New in v0.5.5
- Download iTele v0.5.5 from 23/12/2004
- Service information strings interpreted as if in ISO Latin 1, instead of ASCII. This is still not what the DVB standard specifies, but it is what most providers broadcast.
- Converting slashes in channel names into vertical bars in file save names ('tho this might have broken renaming from the timeshifting drawer/panel).
- Fixed a thread leak in the internal display code - yes threads were leaked every time the displayer started!
- Fixed a reference leak in the internal display code which caused the OpenGL view to not be disposed when the window was closed. This amounted to a huge memory leak, as you can imagine. You should no longer have to restart iTele after watching a few channels.
New in v0.5.4
- Download iTele v0.5.4 from 27/11/2004
- Plugged a lot of holes where corrupt streams could cause crashes, including an especially difficult one where a new stream header was erroneously detected which caused the texture memory to be unmapped underneath OpenGL.
- You can now use the 'b' key to detect and remove black borders from internally displayed video. If it is being displayed in a window, then the window is resized to fit the detected size. If it is being displayed fullscreen, then the image scaling is recalculated to best fit the screen. You may use the key as many times as you like, it's probably a bit oversensitive to very slightly non-black at the moment.
- Fixed bug with AC3 audio where the audio would skip. The decoder behaves in a way that I did not expect for some AC3 streams.
- Fixed bug where display controls could come up as a drawer when in fullscreen with multiple monitors.
- Fixed use of LNB threshold to switch between high and low settings (was using MHz as if Hz)
- Fixed incorrectly limited range of satellite tuners (upper limit is now 2200MHz not 2000MHz)
- Stopped complaints upon encountering extended EIT tables
- Made the recognition of undescribed ATSC audio streams actually work
New in v0.5.3
- Download iTele v0.5.3 from 19/9/2004
- Better recognition of American ATSC audio streams (where descriptor missing).
- Works in Mac OS X 10.2 (Jaguar) again. Taken steps to try to keep it that way.
- Implemented fullscreen internal display. Does letter/pillar boxing as appropriate. Does not change screen resolution. Chooses screen that cursor is in when command invoked.
- Can open a previously recorded file for playback, with progress bar and usual goodies. This works fullscreen too. Tried for about 4-5 hours to get stupid drag'n'drop (onto an NSTableView) to work but eventually gave up :(
- Tweaks to a/v syncing code to handle longer latencies
- Fixed bug with crashing on exit after clean install that prevented prefs & channel list from being saved out. Why didn't someone complain to me about this one?
New in v0.5.2
- Download iTele v0.5.2 from 2/9/2004
- Recognises AC-3 audio streams in ATSC transport streams
- Updated to CVS head version of libavcodec, and using mainstream multithreaded decoding implementation instead of my own homegrown version (also re-enabled using multiple threads as that had somehow got commented out a while ago - whoops!)
- Not mapping in whole contiguous range of textures when doing internal display, as it seems the OpenGL drivers don't like mapping in more than about 100MB. So it has an individual mapping for each texture. May be slight reduction in performance but I couldn't perceive it.
- Channel lists for Korea and North America (and 8VSB thru cable as found in some parts of Korea)
New in v0.5.0
- Download iTele v0.5.0 from 26/7/2004
- Added the Inputs window allowing the simultaneous use of multiple input devices, including tuner ganging!
- Initial support for satellite tuners and attached LNBs!
- Timeshifting with scrubber!
- Volume control, even if started with audio off
- Can choose format of recording name, can even specify a custom format string
- Can select folder to record into, potentially on a different disk
- Window displayed for audio-only channels
- Hopefully fixed some stability issues with closing windows
New in v0.3.7:
- Download iTele v0.3.7 from 20/6/2004
- Tunes to the pids it wants to receive at various times so it can work with low-bandwidth devices that cannot pass the full transport stream
- Fixed a bug with closing windows when another frequency is tuned (not sure when it appeared)
- Corrected high UHF channel frequencies for Australia (fixed by Gary Makin)
New in v0.3.6:
New in v0.3.5:
- Download iTele v0.3.5 from 29/2/2004
- Watch internally using ffmpeg with audio/video sync (now usable)
- Watch internally is a remembered mode set from menu
- Internal audio playback too now (maybe some corruption probs?)
- 'Stop watching' for audio only channels and to get EPG info
- Video display efficiency improvements
- Video display can be moved (and resized in 'little' mode)
- Video display with either pixel shaders or multistage
- Video display colour improvements in multistage mode
- Video display texel alignment (no blurring/green border)
- Better EPG parsing (handling two tables in same TS packet)
- Path to mplayer can have spaces
- Mplayer launch error detection
- Low-numbered 7MHz channel settings for Germany
- Window and column positions saved and restored
- Fixed non-natural-language date entry for scheduled recording
New in v0.3.0:
- Download iTele v0.3.0
- Added first pass of scheduled recording! GUI and functionality. Not very well tested. EPG-based recording in particular is likely to have problems.
- Fixed channels list display problems, especially when scanning for the first time.
- Fixed a couple of instabilities in 'watch internally', in particular you can now move the window around and close it (yay!) ... but only once. Also fixed it for the EMU_EDGE decoding option being turned off (which it inadvertently was for this release - sorry!)
New in v0.2.5:
- Download iTele v0.2.5
- Handles AC-3 sound. Turns out there's a header in the PS that isn't in the TS.
- First attempt at EPG ('now and next' only). It is integrated into the Channels window. Ugly but temporary for rushed Panther release.
- Can display video internally using OpenGL accelerations and a multithreaded version of ffmpeg. If you have a dual processor Mac (>=1GHz) then you can watch HD channels with this. No internal audio yet (too many APIs!)
- Added settings for the UK and Germany into the scan location list. I hope they work!
- Deals with multiple audio/video streams in a program by choosing only one. Especially important with AC-3 (always chooses it if available).
New in v0.2:
- Download iTele v0.2
- Works with new MMInputFamily driver model
- Initialises tuner much faster
- Fixed lots of crashes
- Prototype 'scheduled recording' window (doesn't actually work)
- Detects absence of MMInput devices and initialisation errors instead of leaving initialisation window up forever
Original v0.1:
Plans
Stuff I want to do but have not yet done (very old list):
- Early/late settings per channel for scheduled recording
- (above for beta)
- ATSC PSIP support
- Teletext
- (above for first release)
- Disclosure triangles to view/aggregate channel elements
- MHP?
- (above for second release)
- As you can see there is a fair way to go ('tho a decent distance has already been covered)
Stuff that used to be on that list but which I have now done:
- 0.6.0
- Long EPG
- Signal level meter
- CPU stress meter (not doing just use Activity Montior)
- 0.5.2
- 0.5.0
- Recording window (rename file, time shifting)
- Many more locations ... on web?
- Multiple tuners and ganging
- 0.3.5
- Integrate mplayer/libmpeg2/DVDPlayer/whatever into iTele
- Fix mplayer issues with digital radio (not doing now)
- Keep pipe to mplayer for volume control/full screen (not doing now)
- 0.3.0
- 0.2.5
- Fix sound on AC3 channels
- Short EPG
- 0.2
- Power management in driver!
- Driver cleanup/generalisation
Back to DVB pageLast updated 17/5/2006 by John Dalgliesh